
DIY IKEA Rast Dresser Upgrade

Image via IKEA.com
While we do love the raw pine finish of this IKEA Rast dresser, we thought it could be livened up with a stencil. Stencils are a great way to make an IKEA product unique and have guests asking where you got it from.
“What’s that? It’s from IKEA? And you painted it yourself? No way! Show me how!”
Look no further than this tutorial! With a single stencil and a spare 30 minutes you can turn a basic piece of furniture into this:
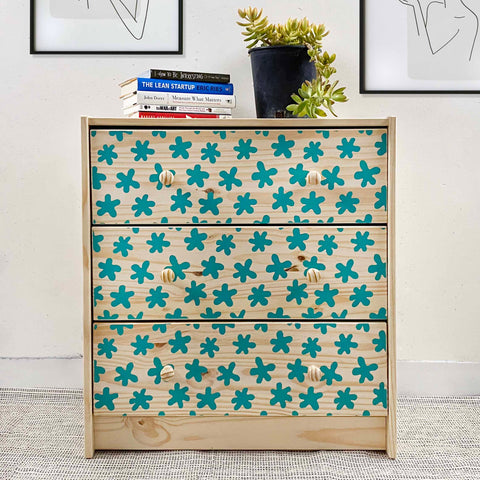
According to StyleCaster, the 70s are coming back in a big way this year, and daisy patterns are at the forefront of the trend. Our Lazy Daisy Pattern stencil is perfect for adding a touch of subtle groove to your home.
Here’s what you’ll need:
- Our Lazy Daisy stencil (any size works!)
- An IKEA Rast dresser or similar
- Acrylic paint or house paint (we used a house paint sample)
- A small paint roller
- Plate or paint tray
- Painter’s tape (optional)
Step 1: Remove the drawers
After putting the dresser together according to the IKEA instructions, we removed the drawers. Place them face up on the floor in order to get the best leverage when painting.

Step 2: Tape off bezels (optional)
For the best results, we taped off the edges of the drawers in order to get a clean line around the edges. This isn’t a necessary step, but if you want a more professional-looking result we recommend using painter’s tape.
Step 3: Pour paint and place your stencil
Pour your paint into either a paint tray or plate so you can dip your roller into it and roll it out. Less is more when it comes to stencils and paint rollers, so make sure you have an area to thin out the paint on your roller. You can also use a paper towel to absorb excess paint.
Placing your stencil is simple, especially because these stencils are larger than the face of the drawers. Line up one edge of the design with the edge of a drawer. If you are afraid of the stencil slipping while you paint, we recommend using an adhesive spray or painter’s tape around the edge of the stencil.
Step 4: Paint!
Here are a few things to remember when using stencils and paint rollers:
Once your stencil is laid down and you are ready to paint, go right ahead!

Step 5: Repeating the stencil
In order to repeat a stencil, you can either use the registration marks we provide on repeatable pattern stencils or simply line it up with previously painted motifs.
If you are using registration marks, we recommend placing your stencil and tracing the “+” mark with an erasable pencil. You will be able to use that mark to help place your stencil the next time you need to move it over.
Step 6: Screw in the knobs and replace the drawers
Once the paint is dry and the tape can be peeled off, you’re ready to screw the knobs back into place. Then the drawers can be put back in as well.

In just a quick 30 minutes to an hour, you have a brand new dresser with a touch of the 70s.
Here’s how we styled it:


Leave a comment
This site is protected by reCAPTCHA and the Google Privacy Policy and Terms of Service apply.